DNS forwarding to Microsoft Azure
12 Mar 2021 - Michal Stovicek
DNS basics
It is a common practice to have an on-premisses DNS server which handles an internal domain such as company.local. These servers are configured on the devices across the company and they are used to resolve DNS for the local domain(s). They also serve as a so called recursive DNS resolvers. This is perfectly acceptable until there is a need to resolve private DNS zones in a cloud (or somewhere else where private DNS zones are used). For such situations, you would want to use DNS forwarder. In this article I am going to explain the differences between three DNS server types - Authoritative, Recursive and Forwarding - and how to use those on-premisses and in the cloud. Since I usually work with Microsoft Azure, I’ll do all the stuff there, but mostly the same would apply for any other cloud provider (although AWS Route53 provides DNS forwarding, so it would be usually better option for AWS customers since it is a managed service).
Before we dive into the DNS server types, I would like to give you a brief introduction into DNS resource records. There are couple of RRs which are widely used and some of them will be used throughout this post:
- SOA (Start Of Authority) - This record can be found in each DNS zone (domain and it’s subdomains managed by one authority) and contains administrative information about that particular zone. One of the main use cases of this record is zone-transfer within clustered DNS servers.
- NS - This record is used for subdomain delegation to another DNS servers.
- A - This one is the mostly used one. It maps a hostname to an IP address.
- AAAA - The same as A but this time for IPv6.
- PTR - This is the opposite of the A record. It maps an IP address to a hostname.
- CNAME - This is an alias for an A record. It maps one hostname to another hostname.
- MX - This record type serves information about Mail servers for the specified domain and their priorities.
- TXT - This is a text record used usually to prove that you are the owner of a domain or for e-mail security purposes such as SPF and DKIM.
Alright, so we have basic understanding of DNS resource records now and so we can proceed to the three DNS server types I’ve mentioned earlier.
Authoritative DNS server - This is a server which has authoritative information about a zone. So for example, I can have a domain mycompany.com and it is hosted on one of my servers in a zone file. I also have a subdomain named web.mycompany.com hosted on another server with a hostname of dns-web-0.mycompany.com. Now, the server which is hosting the mycompany.com domain has to have an NS resource record which says that web.mycompany.com domain is served by a server with a hostname of dns-web-0.mycompany.com. This is because clients are always asking the root DNS servers first and they go down recursively until they get the answer they asked for. You may see this behavior with the dig +trace <some_domain> command on Linux. However, this recursive lookup is not used when the client uses the authoritative DNS server as it’s own DNS server (typically obtained via DHCP). In such case there is no need to do the recursive lookup since the server already knows about the domain and can respond directly to the client.
Recursive DNS server - This type of DNS server doesn’t host any zone. It is also usually called caching DNS recursor because it uses a cache for queries which were already run against it which in turn results in faster replies to the clients. This is especially usefull when there is a lot of DNS queries - for example big company with thousands of workstations and servers. In such case you would usually use couple of authoritative servers and put some recursive servers on the network.
Forwarding DNS server - The last of the three DNS server types. This is similar to the recursive DNS server but it works the opposite way. When the forwarding DNS server receives a request from a client, it forwards that particular request to another server which it has in it’s configuration. So, instead of recursively asking the root DNS servers first, it asks the preconfigured DNS servers directly (you effectively replace part of the DNS tree). This is especially usefull with private domains which are not known to the public DNS servers and so they can’t be resolved by the recursive DNS servers. If you work with any public cloud (it could be even private cloud or just a datacenter) and you have your virtual machines and other services in a private network you usually want to connect to them via DNS hostname and this is the situation I am going to describe and configure later in this post.
DNS infrastructure architecture
Let’s start with the infrastructure architecture. For simplicity, I am going to use single authoritative server on-premisses, one forwarding server on-premisses and one forwarding server in the cloud (MS Azure in my case). Here is a simple diagram of the solution:
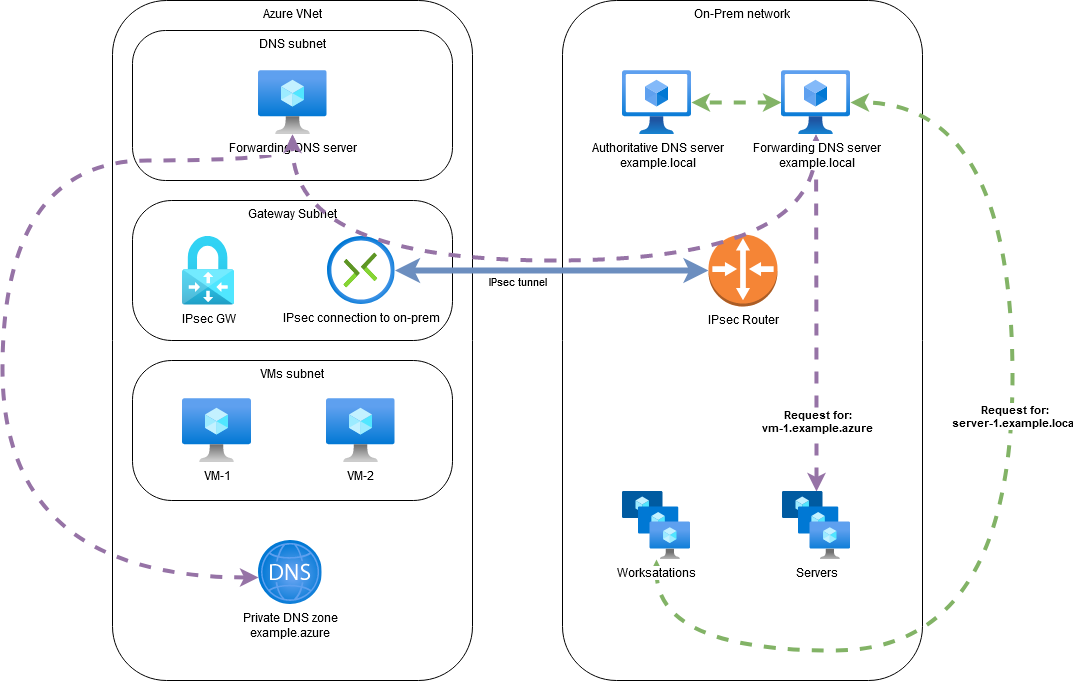
From the diagram above you can see a basic DNS requests flow for a server in example.lan domain and another one for a VM in Azure - example.azure domain. There is also an IPSec tunnel between on-premisses and Azure Virtual Network so that the communication is encrypted and uses private IP addresses.
Note that the client systems from the on-prem network are always asking the forwarding DNS server first. This is because it provides a caching mechanism and so it can reply directly to the client unless the cache is invalidated.
Also note that the cloud instances in this scenario won’t be able to resolve the hostnames in example.lan domain unless the DNS forwarder in the cloud is set as the main DNS server in the cloud virtual network. That DNS server would also need to forward requests for the example.azure domain to the cloud DNS service and to the on-premisses DNS servers for example.lan domain to make it work.
DNS servers configuration
I have chosen the Knot DNS server as the authoritative DNS server and Unbound as the recursive DNS server. Knot DNS is lightweight DNS server by CZ.NIC and it is not such a bloated software as Bind or PowerDNS are. Unbound is a recursive DNS server which can also host small zones or so called stub zones (zone containing SOA, NS and possilby glue A records but the server is not authoritative for that zone).
Alright, so now we are ready to proceed with the configuration. First system to configure will be the authoritative DNS server for the example.lan domain.
Note: I am using LXD to run the on-prem services because it doesn’t need that much resources as full VMs do and the user experience is similar to Virtual Machines. I’ll also use Fedora linux 33 for this particular setup.
First of all, we need to install the Knot DNS server which is present in Fedora repositories via dnf:
$ sudo dnf install -y knot
...
Total download size: 1.1 M
Installed size: 3.6 M
...
Now that we have our Authoritative DNS server installed we can go ahead and configure it. The main configuration file is located at /etc/knot/knot.conf so let’s update that file. Since we have only one authoritative DNS server for the example.lan domain it is pretty short configuration:
$ cat >/etc/knot/knot.conf<<EOF
server:
    rundir: "/run/knot"
    user: knot:knot
    listen: [ 127.0.0.1@5353, ::1@5353 ]

log:
  - target: syslog
    any: info

database:
    storage: "/var/lib/knot"

template:
  - id: default
    storage: "/var/lib/knot/zones"
    file: "%s.zone"

zone:
  - domain: example.lan
EOF
As you can see, Knot uses YAML for it’s configuration. In the above configuration file I just defined the zone for domain example.lan which uses the default template. Templates can be used by multiple zones so that you don’t have to specify file names, directories containing zone files, whether to check the zone file before loading, etc. Also note that the server is listening on localhost only (it listens on both IPv4 and IPv6 loopback addresses) with port 5353. This is enough information to start the DNS server, however, we still don’t have the zone file for the example.lan zone. Let’s go ahead and create the zone file.
Zone files are standardized by RFC 1035 (section 5) so it’s format is always the same no matter which DNS server you use. Here is my example.lan zone file:
$ cat /var/lib/knot/zones/example.lan.zone
$ORIGIN example.lan.
$TTL 3600
@       IN      SOA     knot-dns.example.lan. michal.stovicek.example.com. (
        1 ; Serial Number
        900 ; Time To Refresh
        600 ; Time To Retry
        86400 ; Time To Expire
        3600 ) ; Minimum Time To Live

@             IN      NS      knot-dns.example.lan.
knot-dns      IN      A       10.20.30.174
There are three records in the zone file:
- SOA - it says that the main DNS server for this zone is knot-dns.example.lan, administrator responsible for the zone is michal.stovicek@example.com (note that the e-mail must be in domain notation, so
.instead of@and ends with another.). The serial number should be increased with each edit of the zone file. In this case it doesn’t really matter what you put into the other parameters as their main purpose is for secondary servers when doing zone transfer (search for AXFR and IXFR on google if interested). - NS - See the
knot-dns.example.lan.in theSOArecord? This just says that example.lan. domain is located at knod-dns.example.lan. DNS server. - A - Since we have the
NSrecord, we should also have so called glue record here which says what IP address is assigned to theknot-dns.example.lan.server. If you usedigcommand in Linux, this will be shown in the ADDITIONAL SECTION of the output. Here is an example:
Note: Zone file with records like above could also be a stub zone - it has only SOA, NS and A glue records
$  dig NS nic.cz

; <<>> DiG 9.11.27-RedHat-9.11.27-1.fc33 <<>> NS nic.cz
;; global options: +cmd
;; Got answer:
;; ->>HEADER<<- opcode: QUERY, status: NOERROR, id: 21989
;; flags: qr rd ra; QUERY: 1, ANSWER: 3, AUTHORITY: 0, ADDITIONAL: 7

;; OPT PSEUDOSECTION:
; EDNS: version: 0, flags:; udp: 4096
;; QUESTION SECTION:
;nic.cz.                                IN      NS

;; ANSWER SECTION:
nic.cz.                 1800    IN      NS      a.ns.nic.cz.
nic.cz.                 1800    IN      NS      d.ns.nic.cz.
nic.cz.                 1800    IN      NS      b.ns.nic.cz.

;; ADDITIONAL SECTION:
a.ns.nic.cz.            159135  IN      A       194.0.12.1
a.ns.nic.cz.            159135  IN      AAAA    2001:678:f::1
b.ns.nic.cz.            159135  IN      A       194.0.13.1
b.ns.nic.cz.            159135  IN      AAAA    2001:678:10::1
d.ns.nic.cz.            159135  IN      A       193.29.206.1
d.ns.nic.cz.            159135  IN      AAAA    2001:678:1::1

;; Query time: 2 msec
;; SERVER: 10.20.30.1#53(10.20.30.1)
;; WHEN: Fri Feb 19 18:02:22 UTC 2021
;; MSG SIZE  rcvd: 218
The above output is for public domain nic.cz.. You can see the ADDITIONAL SECTION which shows A and AAAA records for the name servers in the ANSWER SECTION.
If I had some servers in the example.lan domain, I could add A records for those into the /var/lib/knot/zones/example.lan.zone file. But for now I am OK with just the DNS server.
We can start our DNS server now and try dig for the example.lan domain. To start the server just run systemctl enable knot.service --now.
Here is the result of DNS lookup from the localhost:
$ dig NS example.lan @localhost -p 5353

; <<>> DiG 9.11.27-RedHat-9.11.27-1.fc33 <<>> NS example.lan @localhost
;; global options: +cmd
;; Got answer:
;; WARNING: .local is reserved for Multicast DNS
;; You are currently testing what happens when an mDNS query is leaked to DNS
;; ->>HEADER<<- opcode: QUERY, status: NOERROR, id: 14040
;; flags: qr aa rd; QUERY: 1, ANSWER: 1, AUTHORITY: 0, ADDITIONAL: 2
;; WARNING: recursion requested but not available

;; OPT PSEUDOSECTION:
; EDNS: version: 0, flags:; udp: 1232
;; QUESTION SECTION:
;example.lan.                 IN      NS

;; ANSWER SECTION:
example.lan.          3600    IN      NS      knot-dns.example.lan.

;; ADDITIONAL SECTION:
knot-dns.example.lan. 3600    IN      A       10.20.30.174

;; Query time: 0 msec
;; SERVER: ::1#53(::1)
;; WHEN: Fri Feb 19 18:01:16 UTC 2021
;; MSG SIZE  rcvd: 81
See? Similar output as for the nic.cz above, although with much less records.
Now that the authoritative server is up and running we can install the recursive DNS server on the same box:
dnf install -y unbound
Unbound has it’s configuration files in /etc/unbound/. First of all I am going to create a new configuration file for zone forwards and put configuration for the example.lan zone in it:
$ cat >/etc/unbound/conf.d/example.conf<<EOF
forward-zone:
      name: "example.lan"
      forward-addr: 10.20.30.174@5353
      forward-no-cache: no
EOF
Note: All the
/etc/unbound/conf.d/*.conffiles are included from the main configuration file by default viainclude: /etc/unbound/conf.d/*.confdirective in the/etc/unbound/unbound.conf.
What we need to do now is to update the /etc/unbound/unbound.conf file and set the Unbound to listen on an interface since the default is localhost only. We also want to restrict allowed clients to a specific IP subnet (10.20.30.0/24 in my case). Such configuration can be done in the server section as follows:
server:
    ...
    interface: 10.20.30.174
    port: 53
    ...
    access-control: 10.20.30.0/24 allow
    access-control: 127.0.0.0/8 allow
    access-control: 0.0.0.0/0 refuse
    ...
    ...
    do-not-query-localhost: no
    domain-insecure: "lan."
    ...
Note: The
do-not-query-localhost: nostatement must be set to no (default yes) in my case since the authoritative server is on the same host as the forwarding DNS server. Alsodomain-insecureis used to ignore DNSSEC chain of trust since we don’t use DNSSEC.
Alright, let’s start the Unbound DNS forwarder and try to resolve our example.lan SOA record:
$ sudo systemctl enable unbound --now
Created symlink /etc/systemd/system/multi-user.target.wants/unbound.service → /usr/lib/systemd/system/unbound.service.

$ dig  SOA example.lan

; <<>> DiG 9.11.27-RedHat-9.11.27-1.fc33 <<>> SOA example.lan
;; global options: +cmd
;; Got answer:
;; ->>HEADER<<- opcode: QUERY, status: NOERROR, id: 32542
;; flags: qr rd ra; QUERY: 1, ANSWER: 1, AUTHORITY: 0, ADDITIONAL: 1

;; OPT PSEUDOSECTION:
; EDNS: version: 0, flags:; udp: 1232
;; QUESTION SECTION:
;example.lan.                   IN      SOA

;; ANSWER SECTION:
example.lan.            3583    IN      SOA     knot-dns.example.lan. michal.stovicek.example.com. 1 900 600 86400 3600

;; Query time: 0 msec
;; SERVER: 10.20.30.174#53(10.20.30.174)
;; WHEN: Tue Mar 09 09:07:45 UTC 2021
;; MSG SIZE  rcvd: 112
From the above query you can see that the server who responded to the query is actually Unbound forwarding DNS server. You see the ;; SERVER: 10.20.30.174#53(10.20.30.174) line, don’t you? More specifically notice the port was 53 where Unbound is listening.
OK, so we have the local DNS services working and so we can jump into the cloud and configure a forwarder there. It is very similar configuration to the above Unbound server setup.
First of all we need a network in the cloud and the site-to-site VPN. Of course we can use other types of connections like Azure Express Route if the setup is being done in a data center or we can use public IP address for our cloud DNS server which I can’t recommend in terms of security. I already have the network ready as well as site-to-site IPsec connection between Azure VNet and my home router. If you need to set that up I suggest you to go through your cloud provider’s documentation such as Azure VNet and Azure VPN Gateway setup for Microsoft Azure.
Another step is to create a Virtual Machine which will work as our DNS forwarder (we can also use multiple instances in an Availability Set for higher availability but one is enough for testing purposes). The commands bellow are for Microsoft Azure so you may need to use different commands for you cloud provider.
SUBNET_ID=$(az network vnet subnet show --name snet-test-westeurope --vnet-name vnet-test-westeurope -g rg-test-westeurope --query "id" -o tsv)
VM_PASSWORD=$(pwmake 96)

az vm create -n dns-server-0 \
  -g rg-test-westeurope \
  --image centos \
  --nsg "" \
  --subnet $SUBNET_ID \
  --public-ip-address "" \
  --authentication-type password \
  --admin-username centos \
  --admin-password $VM_PASSWORD \
  --size Standard_B1ms
Note: The above BASH script generates a password using
pwmakeand stores it in variableVM_PASSWORD. You can then retrieve the password by issuingecho $VM_PASSWORDcommand.
Well done! So now we have a clean VM which will be used as a DNS server. Let’s set it up now. First of all we need to install the Unbound DNS server again and configure it. This will be pretty much the same as we did in the on-prem:
yum install -y unbound
systemctl enable unbound.service
cd /etc/unbound/
vi unbound.conf
Since we have just one NIC (Network Interface Card) attached to our VM, we can let Unbound to listen on all interfaces which is 0.0.0.0. This might not be appropriate for production setup though. You can (and should for production usage) also use Network Security Groups to protect your VMs. Anyway, here is what we need to change in the unbound.conf file:
server:
    ...
    interface: 0.0.0.0
    port: 53
    ...
    access-control: 127.0.0.0/8 allow
    # Here you may want to add specific IP addresses of the systems on-premisses which should be allowed to query the server
    # But for now, let's allow all of the /24 network
    access-control: 10.20.30.0/24 allow
    # This will allow queries from our cloud network, although it's not really needed in our case since we want to only forward requests
    # from on-premisses to the cloud - not the opposite way
    #access-control: 10.40.0.0/16 allow
    # And here we refuse anything else
    access-control: 0.0.0.0/0 refuse
    ...
    # This one will be needed if we want to allow bi-directional forwarding (on-prem <---> cloud)
    #domain-insecure: "lan."
    domain-insecure: "azure."
    ...
Now we need to create the forwarding configuration the same way as we did for the on-premisses zone but this time we are going to forward every request to the Azure provided DNS server. There is only one address which is an anycast IP address and doesn’t ever change. This is the case with other cloud providers as well (for example the second IP address of your VPC CIDR block on AWS). So, now we create the forwarding rule and start the unbound DNS server:
cat >/etc/unbound/conf.d/example.conf<<EOF
forward-zone:
        name: "."
        forward-addr: 168.63.129.16
EOF
systemctl start unbound.service
And that’s it! Now it should be possible to resolve private DNS names in the cloud from on-premisses. In Microsoft Azure, you can create the private DNS zone with auto-registration enabled, so any virtual machine created in a VNet which has a link to such private DNS zone has a DNS name as per it’s name defined during creation. In other words when I create a VM with name my-server in a VNet which is linked to a private DNS zone with name let’s say my-private-zone.westeurope.azure, then there will be automatically created DNS record my-server.my-private-zone.westeurope.azure.
Here is how the DNS zone looks like in our testing environment:
$ az network private-dns zone show
  --name example.azure \
  -g rg-test-westeurope --query '{ZoneName:name, VnetLinksWithAutoRegistration:numberOfVirtualNetworkLinksWithRegistration}'

ZoneName                           VnetLinksWithAutoRegistration
---------------------------------  -------------------------------
example.azure                      1

$ az network private-dns record-set a list \
  -z example.azure -g rg-test-westeurope

Name           ResourceGroup                      Ttl    Type    AutoRegistered    Metadata
------         ---------------------------------  -----  ------  ----------------  ----------
dns-server-0   rg-test-westeurope                 10     A       True
As you can see, there is already a DNS record for the VM we created earlier. Let’s try to resolve the DNS server’s IP address from the on-premisses:
$ host dns-server-0.example.azure
Host dns-server-0.example.azure not found: 3(NXDOMAIN)
Wait, what? Why can’t we resolve that?! The thing is that we have no forwarding rule on our on-premisses server to forward requests to the cloud. Let’s fix that now:
$ VM_IP=$(az vm show --name dns-server-0 -g rg-test-westeurope -d --query privateIps -o tsv)
$ cat >>/etc/unbound/conf.d/example.conf<<EOF
forward-zone:
      name: "example.azure"
      forward-addr: ${VM_IP}
      forward-no-cache: no
EOF

$ cat /etc/unbound/conf.d/example.conf
forward-zone:
      name: "example.lan"
      forward-addr: 10.20.30.174@5353
      forward-no-cache: no
forward-zone:
      name: "example.azure"
      forward-addr: 10.40.0.4
      forward-no-cache: no
$ systemctl restart unbound.service
Alright, so let’s try the resolution from the on-premisses VM again:
$ host dns-server-0.example.azure
dns-server-0.test.azure has address 10.40.0.4
Voila! Now we are able to resolve the cloud names and so we don’t need to remember or keep track of IP addresses. Moreover, since there is the auto-registration feature enabled for our private DNS zone example.azure, the DNS records will change automatically if the IP address associated with any VM in the VNet is changed.
Of course, this is just an example of how to do the DNS forwarding to the cloud. For a production usage you would probably want bigger VM instances with security groups associated, you would want to tune the servers little bit with rate-limiting, etc. and last but not least you would want to have the instances highly available (for example by using Azure Availability Sets) since DNS service may be crucial for you hybrid workload. That’s it, you can try on your own! (-: